Floral Morphology and Character Laboratory
A demonstration of the scanning process will be done prior to
the hike.
Obtaining specimen
During the walk various floral types will be examined and
looked at. You might want to make notes as we walk.
On the walk try to find a flower that has three or four of the
whorls obviously present on the flower. Try to find a flower that
differs from that of your classmates. Do take inflorescences that
are obviously owned or otherwise not freely available.
Scanning
- You will probably have to cut the flower in half so as to
reveal the characteristics you are trying to scan and
label
- Place the specimen on the scanner
- In the computer laboratory on A204-29 open up from the
Programs menu HP DeskScan II: HP DeskScan II
- Scan in the specimen at 100% or larger. Here we will go
for a larger image size so that we can label the image.
- Save as a TIF file to the My Documents folder. Use the
first eight characters of your name for the file name.
Image Editing
- Open PhotoStudio: PhotoStudio 2.0.
- Open your TIF file.
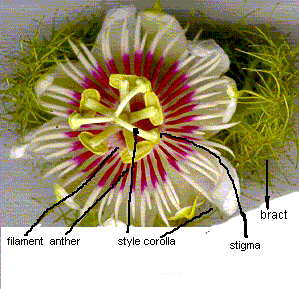
- As shown in class, add text and lines to label the major
characters of the flower. If you are doing an
inflorescence, then also type the inflorescence type on
the image. The major characters should include, to the
extent possible:

- pedicel
- calyx - sepals
- corolla - petals
- stamen
- carpel
- You might need to use TWO images to label your floral
image fully. The sample image shown is INCOMPLETE, it is
missing a view of the ovary and the calyx. The image is
meant merely to help give you an idea of what you are
trying to create.
- From the transform menu select resample.
- Multiply the width of your image in pixels by the height
in pixels. If the result is more than 100,000 pixels,
then reduce your image size to be less than 100,000
pixels. WRITE DOWN the final width and height of your
image in pixels.
- Save the image as a JPEG at a quality setting of 90 on
your floppy disk. Use the first eight characters of your
name for the file name.
Creating the Web Page
- Open notepad from the Programs: Accessories menu
- Save the file to your floppy disk using the first eight
letters of your name and the extension .html along with
quotes. For example my file would be "leeling.html"
- In the note pad type the following:
<html>
<head>
<title>Floral Morphology</title>
</head>
<body>
<p>
<img src="leeling.jpg" alt="floral
morphology" width="200" height="150"
/>
</p>
<p>
Collected by: (your name)
</p>
<p>
<a href="http://www.comfsm.fm/~dleeling/botany.html">Botany
Course Home Page
</a>
</p>
</body
</html>
- Note that you will change the image file name, the alt,
the width, and the height to match your specimen. The alt
tag is the text that is displayed when the user rolls
their mouse over the picture. The second instance of
ovate is the plain text displayed on the page.
- Save the notepad file.
- Open up the Floppy a Drive windows explorer.
- Double click on the notepad file you created with the .html
extension.
HTML tag information
<html> open html file
<head> open file header
<title> file title</title>( the slash always
means "close operation")
</head> close file header
<body>open text body of file
<p>start new Paragraph</p>
<img src="ovate.jpg" alt="ovate" width="200"
height="150" /> load an image with alternate
text property set to value in quotes and with the specified
width and height. Note the "close operation" slash
is included in the tag.
<br /> line BReak or line feed without starting a
new paragraph. Also closes itself.
</p> close paragraph
<p>
<a href="http://www.comfsm.fm/~dleeling/botany.html">
hyperlink to another web site or page
Botany Course Home Page hyperlink text
</a> close hyperlink
</p>
</body> close body
</html> close html file
Botany
home page
Lee Ling home
COM-FSM home page

